среда, 28 августа 2013 г.

Disk Space Windows 7

This post is about disk space and the disk space “consumed” by Windows 7. Disk space is the sort of thing where everyone wants to use less, but the cost of using a bit more relative to the benefits has generally been a positive tradeoff. Things have changed recently with the availability of solid-state drives in capacities significantly smaller than the trend in spinning drives. Traditionally most all software, including Windows, would not hesitate to consume a 100MB on a specific (justified) need when looking at a 60GB (or 1,500GB) drive; with desirable machines shipping with 16GB of solid-state storage, we are looking carefully at the disk space used by Windows—both at setup time and also as a PC “ages”. We also had a specific session at WinHEC on solid-state drives that might be interesting to folks. This post is authored by Michael Beck, a program manager in the core OS deployment feature team. --Steven
Let’s talk about “footprint”. For the purposes of this post, when I say “footprint” I’m talking about the total amount of physical disk space used by Windows. This includes not only the Windows binaries, but all disk space consumed or reserved for system operations. Later in this entry, I’ll discuss in detail how the disk footprint is consumed by various Windows technologies.
A number of comments have asked about disk footprint and what to expect in terms of Windows 7’s usage of disk space. Like many of the design issues we have talked about, disk space is also one where there are tradeoffs involved so this post goes into the details of some of those tradeoffs and also discusses some of the feedback we have received. It should be noted, that we are not at the point where we are committing to system requirements for Windows 7, so consider this background and engineering focus.
To structure this post we’ll take two important points of feedback or questions we have received:
  • What does the WinSxS directory contains and why is it so big, and can I just delete it?
  • Where does all the disk space go for Windows components?
We’ll then talk about the focus and engineering of Windows 7.

WinSxS directory

We definitely get a lot of questions about the new (to Vista) Windows SxS directory (%System Root%\winsxs) and many folks believe this is a big consumer of disk space as just bringing up the properties on a newly installed system shows over 3000 files and over 3.5 GB of disk consumed. Over time this directory grows to even higher numbers. Yikes--below is an example from a Steven's home PC.
Example properties sheet for WinSxS directory.
“Modularizing” the operating system was an engineering goal in Windows Vista. This was to solve a number of issues in legacy Windows related to installation, servicing and reliability. The Windows SxS directory represents the “installation and servicing state” of all system components. But in reality it doesn’t actually consume as much disk space as it appears when using the built-in tools (DIR and Explorer) to measure disk space used. The fact that we make it tricky for you to know how much space is actually consumed in a directory is definitely a fair point!
In practice, nearly every file in the WinSxS directory is a “hard link” to the physical files elsewhere on the system—meaning that the files are not actually in this directory. For instance in the WinSxS there might be a file called advapi32.dll that takes up >700K however what’s being reported is a hard link to the actual file that lives in the Windows\System32, and it will be counted twice (or more) when simply looking at the individual directories from Windows Explorer.
The value of this is that the servicing platform (the tools that deliver patches and service packs) in Windows can query the WinSxS directory to determine a number of key details about the state of the system, like what’s installed, or available to be installed (optional components, more on those later), what versions, and what updates are on the system to help determine applicability of Windows patches to your specific system. This functionality gives us increased servicing reliability and performance, and supports future engineering efforts providing additional system layering and great configurability.
The WinSxS directory also enables offline servicing, and makes Windows Vista “safe for imaging”. Prior to Windows Vista, inbox deployment support was through “Setup” only. IT professionals would install a single system, and then leverage any number of 3rd party tools to capture the installed state as a general image they then deployed to multiple systems. Windows wasn’t built to be “image aware”. This meant that greater than 80% of systems were deployed and serviced using a technology that wasn’t supported natively, and required IT departments to create custom solutions to deploy and manage Windows effectively. In addition, state stored in the WinSxS directory can be queried “offline”, meaning the image doesn’t have to be booted or running, and patches can be applied to it. These two features of WinSxS give great flexibility and cost reductions to IT departments who deploy Windows Vista, making it easier to create and then service standard corporate images offline.
While it’s true that WinSxS does consume some disk space by simply existing, and there are a number of metadata files, folders, manifests, and catalogs in it, it’s significantly smaller than reported. The actual amount of storage consumed varies, but on a typical system it is about 400MB. While that is not small, we think the robustness provided for servicing is a reasonable tradeoff.
So why does the shell report hard links the way it does? Hard links work to optimize disk footprint for duplicate files all over the system. Application developers can use this functionality to optimize the disk consumption of their applications as well. It’s critical that any path expected by an application appear as a physical file in the file system to support the appropriate loading of the actual file. In this case, the shell is just another application reporting on the files it sees. As a result of this confusion and a desire to reduce disk footprint, many folks have endeavored to just delete this directory to save space.
There have been several blogs and even some “underground” tools that tell you it’s ok to delete the WinSxS directory, and it’s certainly true that after installation, you can remove it from the system and it will appear that the system boots and runs fine. But as described above, this is a very bad practice, as you’re removing the ability to reliably service, all operating system components and the ability to update or configure optional components on your system. Windows Vista only supports the WinSxS directory on the physical drive in its originally installed location. The risks far outweigh the gains removing it or relocating it from the system, given the data described above.

Where does the disk space go?

As we all know adding new functionality consumes additional disk space--in Windows or any software. In reality, “code” takes up a relatively small percentage of the overall Windows footprint.  The actual code required for a Windows Vista Ultimate install is just over 2GB, with the rest of the footprint going to “data” broadly defined. Let’s dig deeper into the use of storage in a Windows Vista installation and what we mean by "data".
Reliability and security were core considerations during the engineering process that built Windows Vista. Much of the growth in footprint comes from a number of core reliability features that users depend on for system recovery, performance, data protection, and troubleshooting. Some of these include system restore, hibernation, page file, registry back up, and logging. Each of these represent “backup state” that is available to the system to recover from any number of situations, some planned and others not. Because we know that different customers will want to make different tradeoffs of disk space relative to recovery (especially on small footprint devices) with Windows 7 we want to make sure you have more control than you currently do to decide ahead of time how much disk space to use for these mechanisms, and we will also tune our defaults to be more sensitive to overall consumption due to the changing nature of storage.
System restore and hibernation are features that help users to confidently recover their system and prevent data loss, in a number of situations such as low battery (hibernation), bad application installation or other machine corruption (system restore). Combined, these features consume a large percentage of the footprint. Because of the amount of space these use, they are easy to identify and make decisions regarding.
System restore protects users by taking snapshots of the system prior to changes and on regular intervals. In Windows Vista, system restore, is configured to consume 300mb minimally, and up to 15% of the physical disk. As the amount of space fills up with restore points, System Restore will delete older restore points to make room for new ones. The more space you have, the greater the number of restore points you have available to “roll back” to. We have definitely heard the feedback from Windows Vista customers around system restore and recognize that the it takes significant space and is not easy to tune. Some have already seen the pre-beta for Windows 7 provides an interface to manage the space better.
Hibernate is primarily used on mobile PCs and saves your work to the hard disk and puts the computer in an extremely low power state.  Hibernate is used on mobile PCs when the battery drains below a certain threshold or when turning the computer off without using Shut Down to extend battery life as much as possible.  On Windows Vista, Hibernate is also automatically used with Sleep on desktop PCs to keep a backup copy of open programs and work. This feature is called Hybrid Sleep and is used to save state to the hard disk in case power fails while the computer is sleeping.  Hibernate writes all of the content in memory (RAM) to a file on the hard drive named Hiberfil.sys.  Therefore, the size of the reserved Hiberfil.sys is equal to the amount of RAM in the machine.  In the Windows Vista timeframe, the amount of RAM being built into computers has increased significantly, thus the disk footprint of Hibernate is more noticeable than before. This space must be reserved up front to guarantee that in a critical low battery situation, the system can easily write memory contents to the disk.  Any mobile PC user that has experienced their computer automatically entering Hibernate when the battery is critically low can appreciate the peace of mind this footprint growth provides. While we're talking about RAM and disk footprint in the same paragraph, Mark Russinovich has a post this week on virtual memory and how big the swapfile could/should/can be that you might find interesting.
Now it’s clear that in the description above, I don’t account for the entire footprint required by Windows Vista. For instance, we also include many sample files, videos, high resolution backgrounds that allow users to easily customize their experience, and try out new features, but we’ve covered a couple of the more common questions out there.
It’s important that we consider more than just the size of the system once deployed, but we must also look at how the system grows over time as services write logs, updates, and service packs are installed, system snapshots are taken etc. For many, the “growth” over time of the installation proves to be the most perplexing—and we hear that and need to do better to (a) make smarter choices and (b) make it clearer what space is being consumed and can be reclaimed.
The following table provides one view of the installation footprint of a Windows Vista Premium/Ultimate installation. This includes the full installation, but to make it digestible this has been broken down into some logical categories and also highlights some specific features. Part of the reason to highlight specific feature is to illustrate the “costs” for items that have been raised as questions (or questionable).
Table of disk space utilization of Windows Vists SP1.
Here are some items worth calling out:
  • ~1GB driver support. Windows Vista works with thousands and thousands of different devices. The ability to plug in almost any device, even your old printer and have it get recognized and install automatically is something customers have come to expect from Windows. We receive lots of feedback wanting to remove some or all of these and each release we carefully scrub the “in-box” device support relative to what we see from telemetry in terms of used devices. The ability to install a printer or USB device while offline is a key value, especially with laptops representing over half of all PCs being sold. In the future we can possibly assume “always go to Windows Update” but we’re not there yet in most places in the world.
  • ~1GB of system growth in serviced and superseded components to support robust rollback and recovery, after installing critical security and functionality updates. We receive a lot of positive feedback about the robustness of servicing but at the same time, the desire to rollback a specific fix for any variety of reasons remains an important robustness and reliability measure. We also understand the feedback we have received regarding the disk requirements to install SP1 on top of RTM. We hope folks are aware of the vsp1cln.exe utility in the system32 directory, for those that are in need of disk space.
  • ~1GB hibernation support is necessary in order to prevent data loss when a machine has been in standby for many hours. This can be removed via the Disk Cleanup wizard or via an elevated command prompt (powercfg /h off).
  • ~315mb of Fonts. Windows users speak many different languages, often on the same PC, and wish Windows to “speak” to them. Windows Vista contains native font support to allow users with systems defaulted to one language to be able to read documents, or websites in another. As we know, however, fonts are east to delete should you desire.
  • ~52MB of log files. Whether it is the event log, servicing logs, or device installation logs (or more) this space is consumed and becomes critical when trying to diagnose a failure. These logs are often used by our support personnel or corporate helpdesks to diagnose a specific failure.

Engineering Windows 7

Windows disk space consumption has trended larger over time. While not desirable, the degree to which it’s been allowed is due in large part to ever-increasing hard drive capacity, combined with a customer need and engineering focus that focused heavily on recoverability, data protection, increasing breadth of device support, and demand for innovative new features. However, the proliferation of Solid State Drives (SSDs) has challenged this trend, and is pushing us to consider disk footprint in a much more thoughtful way and take that into account for Windows 7.
This doesn’t mean that we’re going to stop adding great features or make Windows less reliable or recoverable. As we look to the future, it’s critical that as we innovate, we do so treating the disk space consumed by our work as a valuable resource, and have a clearer design for how Windows uses it. We want to make sure that we are making smart choices for the vast majority of customers and for those desiring more control providing places to fine tune these choices as appropriate. This design goal isn’t about a type of machine, or specific design, all Windows editions benefit from efforts that focus on a reduction of the overall footprint.
For example, as we consider the driver support discussed above, Windows Vista with SP1 installs almost 1GB of drivers on the system to support plug and play of devices. This local cache can get out of date as IHVs release updates to their drivers, and as a result, users are pushed to Windows update to get the latest version once the device is installed.
Why not extend the PnP user experience to include (or only use) the Windows Update cache of drivers and save some disk space? This has several benefits:
  1. Because MobilePCs rarely lack a network connection, they can simply get the new driver from the web.
  2. People don’t have to install the driver twice on updated devices because they do the round trip to the web anyways.
With this example it’s easy to see how engineering for a minimal footprint might actually deliver a better experience for people when attaching new devices to their systems. At the same time, we want to be careful about going too far too soon. We get a tremendous amount of feedback regarding the “plug and play” experience or feedback about costly download times (if download is at all possible). For Windows 7 we are going to continue to be deliberate in what we include based on the telemetry of real world devices and reducing the inbox set to cover the most popular devices around the world. At the same time we will continue a very significant effort around having the best available Windows Update site for all devices we can possibly support.
Windows features installed by default make sense in most cases to support many scenarios. We should consider how we make some features/components (such as Media Center) optional when they are not required rather than installing them by default on every system. We’re committed to make more features of Windows optionally installed. As you might notice today in Windows, when you choose to add a feature that was not installed Windows does not require a source (a DVD or network location). This is because the feature is stashed away as part of a complete Windows install—this is itself a feature. We will always keep features available and will always service them even when components are not installed—that way if you add a component later you do not risk adding a piece of code that might have been exploited earlier. This is another important way we keep Windows up to date and secure, even for optional features.
System growth over time is an area where we need to provide more “transparency”. For instance, Windows will archive previous versions of updated system components to allow robust rollback. A new system will install patches as Windows Update makes them available, just as expected by design. As a Service Pack or other large update is installed that contains or supersedes any of the previous patches; we can simply recover the space used by the old updates sometime after the update is successfully installed.
Windows writes logs in many places to aid in troubleshooting and these logs can grow very large. For instance, when an application crashes, Windows will archive a very large dump file to support analysis of the failure. There are many good reasons for this behavior, but as we change our mindset towards footprint, we need to extend our scenarios to include discussions of how to manage the growth, and recover the disk space consumed whenever possible. Other areas where we are considering the default disk space reserved include System restore and hibernation. On a disk constrained system, the 1GB or more reserved to support hibernation is costly and there may be ways to shrink the size of hiberfil.sys. System restore should be configurable, and default in all cases to the minimally useful number of snapshots vs. a blanket 15% of the system disk.
At WinHEC we had several machines on display with 16GB drives/partitions and on those you could see there was plenty of free disk space. Like all the benchmarks, measuring disk space on the pre-beta is not something we’re encouraging at this time.
In conclusion, as we develop Windows 7 it’s likely that the system footprint will be smaller than Windows Vista with the engineering efforts across the team which should allow for greater flexibility in system designs by PC manufacturers. We will do so with more attention to defaults, more control available to OEMs, end-users and IT pros, and will do so without compromising the reliability and robustness of Windows overall.
-Michael Beck

вторник, 27 августа 2013 г.

Лисья нора. Логово админа

ИзменитьИндекс производительности Windows?

Для того что-бы изменить показатели индекса производительности руками надо:
Для Windows 7!
1. Идем в C:\Windows\Performance\WinSAT\DataStore и удаляем оттуда все файлы.
2. Идем в свойства компьютера и проводим оценку производительности.
3. В папке C:\Windows\Performance\WinSAT\DataStore появится несколько файлов, ищем файл "2011-03-05 17.12.03.106 Formal.Assessment (Initial).WinSAT.xml" (дата в начале имени файла, естественно, будет другой).
4. Открываем файл "ваша дата Formal.Assessment (Initial).WinSAT.xml" с помощью WordPad.
5. Ищем блок <WinSPR> и правим параметры на нужные вам:
 <SystemScore>0.0</SystemScore> (общая оценка)
 <MemoryScore>0.0</MemoryScore> (оперативная память)
 <CpuScore>0.0</CpuScore> (центральный процессор)
 <CPUSubAggScore>0.0</CPUSubAggScore> (доп. параметр ЦП)
 <VideoEncodeScore>0.0</VideoEncodeScore> (кодирование видео)
 <GraphicsScore>0.0</GraphicsScore> (графика Aero)
 <Dx9SubScore>0.0</Dx9SubScore> (и так понятно)
 <Dx10SubScore>0.0</Dx10SubScore> (тоже понятно)
 <GamingScore>7.0</GamingScore> (графика для игр)
 <StdDefPlaybackScore>TRUE</StdDefPlaybackScore> (этот параметр трогать не надо) 
 <HighDefPlaybackScore>TRUE</HighDefPlaybackScore> (тоже пропускаем)
 <DiskScore>0.0</DiskScore> (оценка HDD)
6. Сохраняем изменения в файле и смотрим новый индекс в свойствах системы.
7. Все.


06.03.11
Demash

воскресенье, 18 августа 2013 г.

Грабли. Максим Мошков. Истории из жизни администратора Unix

  Максим Мошков. Истории из жизни администратора Unix, или Грабли

  История 1 со счастливым концом. Испорченный /etc/passwd
  > Один товарищ (не я :), это из Коми) решил своему root'y вместо положенного > /sbin/sh сделать /bin/ksh > Для чего отредактировал /etc/passwd, но неудачно, ошибся и назначил > /sbin/ksh. > Пробовали: > $ su root -c /sbin/sh > Не помогло. Теперь он горько плачет и хакера зовет. > Можешь помочь, или суровое: переустанови юних?
 Это мы проходили. Классика. Перво- наперво "никогда, НИКОГДА не меняй shell у суперюзера..." :-)
 0. Запустить shell из-под root'а все-таки можно: su root -m -s /bin/sh
 Но если еще и пароль забыт, тогда - поможет загрузка в single user mode или загрузка с CD/floppy/tape
 1. Дать команду df, посмотреть минор/мажор у девайса, на который монтируется корень, и затем почитать мануал по команде

 mknod # mkdev, mknode, mksf - создать специальный файл
 # или как там еще она называется
 и записать на бумажке команду, которой создается спец-файл /dev/root (или куда там монтируется "/"

 mknod /dev/root b 3 0x000002 # примерно так
 2. Загрузиться с инсталляционного стриммера/дискеты/CD. и там где уход на install/update/system maintance пойти на "system maintence" (это всего навсего root'вый shell)
 Осталось смонтировать /dev/root на /mnt и редактировать /mnt/etc/passwd
  Засада No 1
 Сразу после загрузки мини-системы специальных файлов соответствующих жесткому диску нет (!). Сделать его ручками - команда mknode уже записана на бумажке.
  Засада No 2
 Редактор vi не запускается (Нет terminfo) Ну и черт с ним. Придумаешь что нибудь. Например
 echo "toor::0:0:Yet another Super-User:/:" >> /mnt/etc/passwd
 ^^^^^^
 обрати внимание что >> а не > (Угадай почему :-)

 а можно и так: PATH=$PATH:/mnt/bin:/mnt/usr/bin export PATH TERMINFO=/mnt/usr/lib/terminfo # или где он там
 Короче - ты дома потренируйся, а потом в Коми напиши точные имена файлов и команд, а то боюсь необученный админ сможет промахнуться пару раз, а здесь промахиваться нельзя.

 Приложение: Обход root passwd в Motorola Unix SVR4/88.

 1. Посмотреть major/minor для / и /usr
 104 0 /dev/root 104 3 /dev/dsk/m197_c0d0s3

 2. Загрузка с ленты, уход на maintance .
 3. Подмонтировать разделы диска, соответствующие / и /usr, с восстановлением файловой системы (т.к. система была выключена некорректно при отсутствии root пароля).
 mkdir /mnt mknod /dev/rootn b 104 0 /etc/fs/ufs/fsck /dev/rootn mount -F ufs /dev/rootn /mnt

 аналогично для /usr
 mknod /dev/usr3 b 104 3 /etc/fs/ufs/fsck /dev/usr3 mount -F ufs /dev/usr3 /mnt/usr

 4. Отредактировать /etc/passwd, сделать беспарольного root
 echo "toor::0:1:Adm:/:/sbin/sh" >> /mnt/etc/passwd

 5. Cменить корень root'у (будет в /mnt)
 chroot /mnt /sbin/sh

 6. Обновить shadow
 pwconv
 Все.

  История 2 почти о том же. Испорченный /etc/fstab

 Date: 20 Apr 1997
 From: Bernshtam Pavel (barnshte@CS.bgu.ac.il)
 У меня тоже было - запортил я /etc/fstab и сделал reboot не заметив ошибки - бабах - поднимается (а это был Axil с SunOS 4.1) в single user.
 я делаю ls - Command not found - понятно - не замоунтил /usr
 посмотрел я на другом SUN'е что есть в /sbin - нашел mount, обрадовался - сделал /sbin/mount /usr.
 Есть VI!
 Помучался пока установил нужный set TERM с полчаса - запустил VI. открываю fstab - фигня со строками (вот оно - не работайте в PICO, учите VI !!!), исправил, save'лю - а root partition то READ ONLY !!!
 Делаю stop-A.
 Слава богу, посоветовали мне, что в boot-мониторе можно сделать b -rw (замаунтить с write), после этого я повторил всю процедуру с mount и VI и исправил /etc/fstab.
 а... еще забыл - VI не запускался пока я /var не замаунтил, т.к /tmp - линк на /var/tmp , а VI без /tmp не идет.
 /* а на Linux специальная команда есть - перемонтироваться на read-write - ее из single-user-mode можно выполнить
 mount -n -o remount / */

  Команда rm -rf в SCO

 Ввиду того, что под шаблон ".*" подходит каталог ".." НИКОГДА НЕ ДЕЛАЙТЕ КОМАНДЫ rm -r .*

 (Большинство unix'ов прощают подобную ошибку, но НЕ ВСЕ)
 
 From: Павел Северов
 "... решил я на нашем SCO-шном сервере с Oraclовской базой расчистить немного свободного места на диске..."

 # cd /usr/tmp
 # rm -rf *
 гляжу, а там всякий хлам остался /usr/tmp/.X11-0 ну и т.п. А я тогда

 # rm -rf .* # ОЙ!

 # du ldd: Can not open file
 # df ldd: Can not open file
 # ls -al ldd: Can not open file
  . . .

 У этой истории грустный конец. Вы уже догадались, что /usr/tmp/.* содержит в себе /usr/tmp/.. После reboot'а машина, не найдя каталога /usr уже не ожила.

  Удаленный доступ или "Запасной ключ от сейфа лежит в сейфе"

 Хорошая штука, Unix + TCP/IP - можно отконфигурить машину у черта на куличках не вставая с рабочего места и даже не выходя из дома.

  История 1. Вот и я однажды менял то ли IP-адрес, то ли роутинг на удаленной машине... Короче - промахнулся, сказал
 ifconfig eth0 down

 Вот собственно и все. Сказать ifconfig eth0 NEW-IP было уже некому.

 Вы конечно догадались, что _НАДО БЫЛО_ одной строкой писать ifconfig eth0 down ; ifconfig eth0 NEW-IP up ; route add ...

  История 2. Захотелось повысить уровень security. Пишем в /etc/hosts.deny ALL:ALL
 в /etc/hosts.allow ALL:193.263.12.13
 ^^^ вроде бы маленькая ошибочка, цифры переставить, а нельзя - я уже успел отлогиниться.

  Удаленный "доступ" или "Ключа вообще нет"

 Повис у нас однажды сервер, надо reset нажать, перегрузить, а комната заперта, и ключи уже унесли. И telnet'ом не войдешь - некуда.

 Вырубили свет на всем этаже, включили вновь - voila!

  Новая /lib/libc.so - апгрейд LIB C

 Linux. 1993 год. Потребовалось подменить LibC. Ну, вперед, делов-то - старую передвинуть, новую - на ее место.

 cd lib
 mv libc.so libc.so-old
 mv libc.so-new libc.so ldd: Can not execute, shared library not found
 Finish.

 Пришлось грузиться с дискеты, монтировать hd.

 Но, как это ни смешно, в следующий раз те же команды, записанные в одну строку, сработали. Или библиотечка в кэше оказалась... Темна вода в Linuxе. Впрочем, файлы из каталога /sbin - обычно staticaly-linked - им для работы разделяемая libc без надобности.

  История 3. Trusted mode - безопасность превыше всего

 В HP-UX новички администраторы очень любят sam'ом поиграть - GUI, мышиный интерфейс - администрируй на здоровье. Вот только читать сообщения надо - а они по-английски все.
 Очень легко, одним "Ok" в SAM включается перевод системы в trusted режим. Включают, и не замечают. А замечают через пару дней, когда с трех раз не угадают пароль root. В trusted режиме логин после этого блокируется совсем, а другого юзера ПЕРЕД ЭТИМ завести - не догадываются.

 Как всегда - нас спасет single user mode: перехват загрузки в prompt IPL и затем

 IPL> hpux -is
 А затем запуск sam. И переконвертировать систему в "untrusted"

 # mount -a
 # sam

 Но если вы ухитрились еще и пароль на boot включить - то помогайте себе сами.

  История 4. Security class C2: о том же, но в SCO
 Security class C2 - это повышенная безопасность. И повышенный геморрой для пользователей. И для администратора - тоже.
 Привелось нам позвонить на защищенную SCO машину из Москвы в Питер, по модему. Скорости getty с первого раза подобрать не смогли, на логин прорывался 6-битный мусор, после третьей попытки вместо getty Login мы увидели "Intruder attempts, tty line /dev/modem disabled".
 Через пару недель хозяин машины вернулся в Питер и вернул getty.

  Screen-сейвер и кнопка Enter
 Когда screen-saver гасит экран, что вы нажимаете? Не знаю, как остальные, а я жму клавишу CTRL.
 Один мой знакомый решил почистить каталог /tmp. Из-под root'а. Набирает он

 rm -rf /tmp/*, точнее хочет набрать, поскольку в момент
 rm -rf /_ звонит телефон и его куда-то вызывают.
 Через час он вернулся, увидел погашенный экран, и нажал _свою_ любимую клавишу. Угадайте, какую?

  Подключение SCSI диска онлайн
 echo "scsi add-single-device 0 0 {id} {lun}" > /proc/scsi/scsi

  Удаленный /dev/null
 Его, конечно, никто не удалял. Так, ерунда, неосторожно исполненная команда
 mv some/file/name /dev/null
 О том, что /dev/null уже не настоящий /dev/null, стало понятно, когда на корневом разделе кончилось место.
 mknod /dev/null c 1 3 спас бедного кота...

  Изящная форк-бомба
 Запишу ее сюда, чтоб не забыть.
 :(){:|:&};:
 При аккуратном рассмотрении видим реккурсивную функцию, которую тут же и вызываем. В записанном виде работать не будет - ибо пробелы нужны (кое-где)
 Вот для измывательств более безопасный вариант:
 :() { sleep 1; echo j; :; };:

  chmod -x chmod
 Запретить исполнение команде chmod Ломаем: chmod -x /bin/chmod
 Лечим: /lib/ld-linux-x86-64.so.2 /bin/chmod +x /bin/chmod

Samba (smb)

UCI configuration options

The UCI configuration file is located at /etc/config/samba

Common Options

The config section type samba determines values and options relevant to the overall operation of samba. The following table lists some (not all) available options, their default value and respectively a short characterization. See http://*** for further details.
These are the default settings for the common options:
config 'samba'
        option 'name' 'openwrt'
        option 'workgroup' 'WORKGROUP'
        option 'description' 'openwrt'
        option 'homes' '1'
NameTypeRequiredDefaultOptionDescription
namestringyes?openwrtName of the Server
workgroupstringyes?WORKGROUPName of the Workgroup
descriptionstringyes?openwrtDescription of the Server
homesbooleanyes?1Share the user directory

Sambashare

The daemons are up and running and recheable via NetBIOS. Now you only need to configure the directories you intend to make accesible to users in your LAN. This example assumes you attached a USB harddisk to the USB-Port and correctly mounted a partition. You can now choose to share the partition as a whole, or just individual directories on it. Fo each entry you need to create an individual config 'sambashare' section.
config 'sambashare'
        option 'name' 'Shares'
        option 'path' '/mnt/sda3'
#       option 'users' 'sandra'
        option 'guest_ok' 'yes'
        option 'create_mask' '0700'
        option 'dir_mask' '0700'
        option 'read_only' 'yes'
NameTypeRequiredDefaultOptionDescription
namestringyes(none)Name of the entry. Will be shown in the filebrowser.
pathfile pathyes(none)The complete path of the directory
usersstringno(none)the samba-users allowed access to this entry; use smbpasswd to create a user-pwd combination! Several users can be specified, separated by a coma (ex : option 'users' 'root,nobody' ).
guest_okstringyesnoSpecifies if you need to login via samba-username and password to access this share
create_maskintegeryes0700chmod mask for files created (need write access)
dir_maskintegeryes0700chmod mask for directories created (need write access)
read_onlybooleanyesnono allows for read/write, else only read access is granted; (for rw, you also need to mount fs rw!)

Additional Configuration Options

In addition to the UCI file (/etc/config/samba), modifications can be made to the /etc/samba/smb.conf.template file.

Configuration examples

Samba can be configured at either share level access or user level access. At share level access all users on the network can access the share, and all files are shared with all users. At user level access a username and password are needed to access the share. By default Samba is configured for user level access.
These configurations have proven to work for some:

Share level access

At share level access all users on the network can access the share, and all files are shared with all users. To set share level access change security = user tosecurity = share in /etc/samba/smb.conf.template:
[global]
 netbios name = |NAME| 
 workgroup = |WORKGROUP|
 server string = |DESCRIPTION|
 syslog = 10
 encrypt passwords = true
 passdb backend = smbpasswd
 obey pam restrictions = yes
 socket options = TCP_NODELAY
 unix charset = ISO-8859-1
        local master = yes
 preferred master = yes
 os level = 20
 security = share
 guest account = nobody
 invalid users = root
 smb passwd file = /etc/samba/smbpasswd
Then add a share to /etc/config/samba. Make sure that guest ok is set to yes
config 'samba'
 option 'name' 'openwrt'
 option 'workgroup' 'WORKGROUP'
 option 'description' 'openwrt'
 option 'homes' '1'

config 'sambashare'
 option 'read_only' 'no'
 option 'create_mask' '0700'
 option 'dir_mask' '0700'
 option 'name' 'name-of-share'
 option 'path' '/path/of/share'
 option 'guest_ok' 'yes'
This share should now be accessible by \\ip-adress-openwrt\name-of-share (windows, username and password can be anything).

User level access

At user level access a username and password are needed to access the share.
Steps:

1. Add user to system

To access a samba share with user level access there must be a user added to the system. Edit /etc/passwd and add a line for the new user. Choose a user id (the first number in the line) of 1000 or higher that does not exist yet. Set the group identification number (the second number) to the same number as the user nobody. Copy the rest.
root:!:0:0:root:/root:/bin/ash
nobody:*:65534:65534:nobody:/var:/bin/false
daemon:*:65534:65534:daemon:/var:/bin/false
newuser:*:1000:65534:newuser:/var:/bin/false
Note: keep in mind that the user(s) and group(s) utilized by Samba need to have the proper permissions for their shares, i.e. they need write access in order to write via smb.

2. Add samba password to user

smbpasswd -a newuser

3. Change samba config to accept users with null passwords

Edit /etc/samba/smb.conf.template and add null passwords = yes:
[global]
 netbios name = |NAME| 
 workgroup = |WORKGROUP|
 server string = |DESCRIPTION|
 syslog = 10
 encrypt passwords = true
 passdb backend = smbpasswd
 obey pam restrictions = yes
 socket options = TCP_NODELAY
 unix charset = ISO-8859-1
        local master = yes
 preferred master = yes
 os level = 20
 security = user
 null passwords = yes
 guest account = nobody
 invalid users = root
 smb passwd file = /etc/samba/smbpasswd

4. Add a share

Then add a share to /etc/config/samba. Make shure that guest ok is set to no
config 'samba'
 option 'name' 'openwrt'
 option 'workgroup' 'WORKGROUP'
 option 'description' 'openwrt'
 option 'homes' '1'

config 'sambashare'
 option 'read_only' 'no'
 option 'create_mask' '0700'
 option 'dir_mask' '0700'
 option 'name' 'name-of-share'
 option 'path' '/path/of/share'
 option 'guest_ok' 'no'
This share should now be accessible by \\ip-adress-openwrt\name-of-share (windows, correct username and password are needed).

Notes

If you use a trunk version and experience connection aborts take a look at this file /etc/samba/samba.conf.template and search for reset on zero vc = yesRemove this line or set it to no.
More information about this issue here: https://dev.openwrt.org/ticket/9992
doc/uci/samba.txt · Last modified: 2013/08/14 10:28 by dylanweber

Включение чего угодно по HTTP без заморочек c OpenWRT

Включение чего угодно по HTTP без заморочек c OpenWRT из песочницыtutorial


В комментариях к статье об опыте изготовления «интернет розетки» мое внимание привлекли два комментария. Один, в котором утверждалось, что такая штука, по сути, бесполезна, показался мне несправедливым — хорошо помню, как мне однажды понадобилось, например, дистанционно «ресетить» одну хитрую штучку и думаю, что я не одинок. А вот идея о том, что можно решить подобный вопрос проще и дешевле, использовав, например, TP-LINK TL-MR3020 + OpenWRT показалась мне дельной. Я решил к тому же обойтись без разборки устройства, программирования и микроконтроллеров — короче, сделать решение как можно доступнее. И у меня это почти получилось!

В качестве устройства вывода используем обычную клавиатуру USB. Встречая в супермаркетах клавиатуры отвратительного качества по смешным ценам, я всегда удивлялся — для чего же она может понадобиться? Да вот же для чего! В клавиатуре три светодиода, которыми можно программно управлять с любого устройства, эту клавиатуру поддерживающего. Заменив светодиоды цепью управления — получаем управление тремя нагрузками. В качестве бонуса – возможность дальнейшей доводки устройства для использования как устройства ввода. Конечно, можно не стрелять из пушки по воробьям, собрать (или приобрести) простейшее устройство на микроконтроллере, у которого будут неосопоримые преимущества (большее количество входов/выходов, нормальные логические уровни и т.п.). Но у «клавиатурного» подхода тоже есть плюсы — он доступен людям, незнакомым с МК, не имеющим программатора. Можно просто взять и сделать работающее устройство сегодня, сейчас. Кроме этого, среди плюсов:
  • решение легко переносимо на другие платформы: я не проверял, но в теории это можно воткнуть в любой «ASUS» или «D-Link», мирно раздающий инет из своего угла (если у него есть USB) — и будет работать;
  • роутер при этом можно использовать по прямому назначению;
  • не требуется разборки роутера и вмешательства в его схему (а TL-MR3020, кстати, нелегко разобрать);
  • не тебуется программирования (если не считать программой небольшой шелл-скрипт) и компиляции;
  • все компоненты можно приобрести в компьютерном магазине (это если просто «помигать светодиодом», для реального управления придется купить пару доступных радиокомпонентов), при этом общие затраты составят менее 1500 рублей.

Ставим OpenWRT и настраиваем сетевой интерфейс

Для этого шага понадобится, собственно, роутер. Мой мне обошелся в 850р.
Страница модели на openwrt.org дает исчерпывающие инструкции по перепрошивке и разрешает нам пользоваться снэпшотом транка. Сам же робко предложу взять бету Attitude Adjustment 12.09. Тем более, что на момент публикации снэпшоты недоступны на сайте openwrt, а A.A.12.09 наконец-то выложили.
Установка состоит из нескольких элементарных операций:

Для установки дополнительных пакетов нужен доступ к репозиторию через интернет, что требует его конфигурации как клиента локальной сети.
Например:

Подключение клавиатуры и проверка управления светодиодами

Сайт H-WRT информирует нас, что для установки клавиатуры нужен лишь модуль kmod-usb-hid.
Установим его:
opkg update
opkg install kmod-usb-hid

Самое время подключить клавиатуру и посмотреть, опозналась ли она:
root@OpenWrt:~# dmesg | tail
[   66.380000] hub 1-0:1.0: connect-debounce failed, port 1 disabled
[   68.780000] hub 1-0:1.0: connect-debounce failed, port 1 disabled
[   71.180000] hub 1-0:1.0: connect-debounce failed, port 1 disabled
root@OpenWrt:~# 

Облом! это совсем не то, что я ожидал. В чем же дело?
Схожий багрепорт быстро находится — разработчики объясняют такое поведение аппаратными ограничениями примененного чипсета. Похоже, находящийся «на борту» USB-хаб не жалует low-speed устройства. Хотя на этом моменте дух Дзен бесследно испарился — не будем опускать руки и попробуем решить проблему подключением клавиатуры через внешний USB-хаб:
root@OpenWrt:~# dmesg | tail
[  143.120000] usb 1-1: new high-speed USB device number 2 using ehci-platform
[  143.270000] hub 1-1:1.0: USB hub found
[  143.270000] hub 1-1:1.0: 4 ports detected
[  143.580000] usb 1-1.2: new low-speed USB device number 3 using ehci-platform
[  143.730000] input: Generic USB Keyboard as /devices/platform/ehci-platform/usb1/1-1/1-1.2/1-1.2:1.0/input/input0
[  143.730000] generic-usb 0003:040B:2000.0001: input: USB HID v1.10 Keyboard [Generic USB Keyboard] on usb-ehci-platform-1.2/input0
[  143.770000] input: Generic USB Keyboard as /devices/platform/ehci-platform/usb1/1-1/1-1.2/1-1.2:1.1/input/input1
[  143.780000] generic-usb 0003:040B:2000.0002: input: USB HID v1.10 Mouse [Generic USB Keyboard] on usb-ehci-platform-1.2/input1
root@OpenWrt

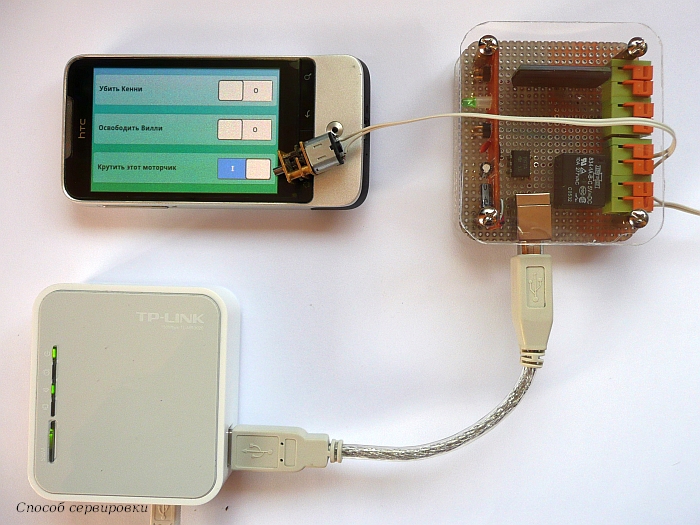
Гораздо лучше. Пускай из-за этого пришлось написать «почти получилось» в начале статьи и «способ сервировки» на фото, но так наша «Generic USB Keyboard» опозналась. На клавиатуру всегда создается два «устройства», но даже и не спрашивайте, почему эта конкретная клавиатура назвалась еще и мышью… Так или иначе — мы готовы к «аппаратному хеллоуворлду» — включить светодиод.
cat /dev/input/event0 > /dev/null &
printf "\x00\x00\x00\x00\x00\x00\x00\x00\x00\x11\x00\x01\x00\x00\x00\x01" > /dev/input/event0

Здесь должен торжественно зажечься светодиод «Caps Lock». Те, кого просто радует этот факт — могут переходить к следующему шагу. Те, кто не может двинуться дальше, не узнав, что за бредовое заклинание приведено выше — заглядывают в
сумбурные пояснения:

Скрипт

Чтобы автоматизировать управление светодиодами нам нужен скрипт. Для того, чтобы на следующем шаге мигать ими по HTTP — сразу положим его в папку /www/cgi-bin:
cd /www
mkdir cgi-bin
cd cgi-bin
wget http://etherelay.googlecode.com/files/ctlrelay
chmod +x ctlrelay

Вот его текст и описание:

Теперь управлять светодиодами легко. Чтобы включить, скажем, светодиод «Scroll Lock», пишем:
./ctlrelay scroll_on

Выключаем:
./ctlrelay scroll_off

Можно еще «мигнуть» (scroll_pulse). Как говорит уже многими здесь уважаемый Anant Agarwal: «I could do this all day. This is so much fun!». Но все же, перейдем к следующему этапу и создадим…

Веб-интерфейс

Какой же веб-интерфейс без веб-сервера? Проверим его наличие:
opkg status uhttpd

Если в выводе есть строка Status: install user installed (а это будет так, если вы используете Attitude Adjustment 12.09 beta) то сервер уже установлен. Иначе установим его и настроим его запуск:
opkg update
opkg install uhttpd
/etc/init.d/uhttpd enable
/etc/init.d/uhttpd start

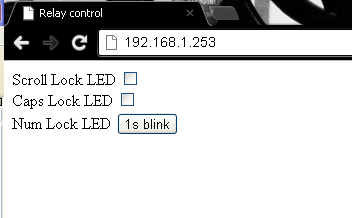
Дальше нам нужна веб-страница:

Маленький нюанс — браузер, конечно, не имеет доступа к папке /var на сервере, поэтому предоставим ему возможность прочитать файл ledstate оттуда, куда он «дотягивается», с помощью симлинка:
ln -s /var/ledstate /www/ledstate

Ссылку на скачивание этой странички, немного измененной, можно найти почти в самом в конце статьи. Теперь можно мигать светодиодами клавиатуры, тыкая в чекбоксы. Но, даже не учитывая того, что мигающим светодиодом сейчас никого не удивить, придется согласиться с тем, что это абсолютно бесполезно с практической точки зрения. Поэтому примемся за железо!

Схема

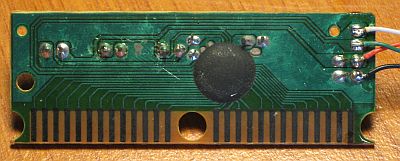
Уже можно разобрать клавиатуру и вытащить из нее плату:

Схему включения светодиодов клавиатуры представим следующей (весьма упрощенной) моделью (для включенного состояния):
схема включения светодиодов клавиатуры
Схема 1. Включение светодиода клавиатуры
Три проверенных «клавы» из «помоечного» сегмента имели именно такое включение светодиодов, отличаются только их токи — обычно около 18мА, но бывает и 3мА. Надо иметь ввиду, что возможны и другие схемы.
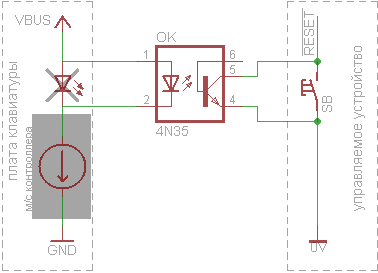
Самое простое — если необходимо коммутировать небольшое напряжение и ток (дистанционный «Reset» какого — либо устройства или эмуляция других кнопок/логических сигналов). Можно обойтись обычной оптопарой:
схема подключения оптопары к клавиатуре для управления логическими уровнями
Схема 2. Формирование логического сигнала
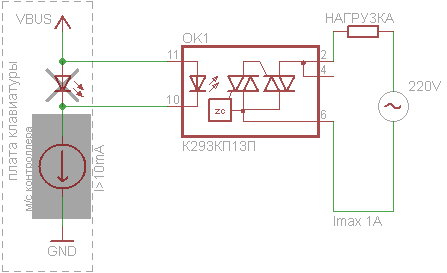
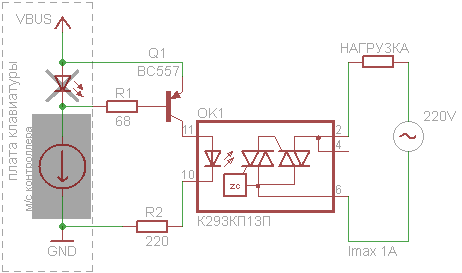
Для управления устройством с питанием от сети берем твердотельное реле:
схема включения твердотельного реле вместо светодиода клавиатуры
Схема 3. Управление твердотельным реле
Я использовал отечественнное реле К293КП13П из-за цены в 170 рублей. Максимальный ток в нагрузке, на которое оно рассчитано — 1А. Ток через управляющий светодиод не должен быть ниже минимального (в документации он обозначается IFmin) для используемого типа реле. Если плата клавиатуры дает меньший ток (отпаяйте один вывод светодиода и измерьте ток в разрыве) — поможет дополнительный транзисторный ключ:
включение твердотельного реле через транзисторный ключ.
Схема 4. Подключение твердотельного реле через ключ
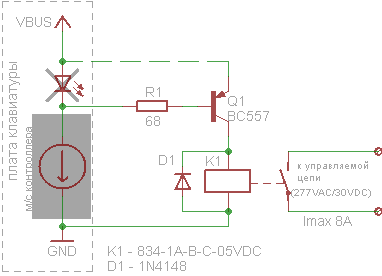
Он же спасет, если используется твердотельное реле, управляемое напряжением или «классическое» электромеханическое реле:
схема подключения реле вместо светодиода клавиатуры
Схема 5. Управление электромеханическим реле
Твердотельное реле — штука достаточно дорогая, и чем мощнее — тем дороже. Обычное реле дает больше «ампер на рубль», но имеет свои минусы. Среди них — большой потребляемый ток во включенном состоянии. Если одновременно включить три реле такой же модели, как на схеме — потребляемый от USB ток будет составлять почти 300 мА. Если не хотите так сильно «доить» порт — подключайте эмиттер не к нему (пунктирная линия на схеме), а к независимому источнику.
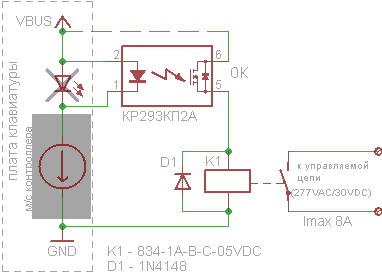
Схемы 4 и 5, само собой, работают только на клавиатурах где СД включены именно по схеме с «общим анодом» (проверьте сопротивление между анодами диодов и «плюсом» платы — должно быть 0 Ом). Если неохота с этим заморачиваться — можно использовать вместо ключа маломощное оптореле. Включается вместо штатного светодиода и работает при токе на светодиод от 5 до 25 мА, то есть подойдет для всех вариантов клавиатур с вероятностью 99%. Если вам надо коммутировать напряжение до 60 в и ток до 300 мА — можно убрать реле и пользоваться оптореле напрямую.
схема подключения реле вместо светодиода клавиатуры
Схема 6. Управление электромеханическим реле при помощи оптореле
В схеме и ее реализации много упрощений:
Что всегда стоит принимать в расчет — это элементарая электробезопасность. Даже тестовое устройство — особеннотестовое устройство, которое наверняка будет болтаться где-нибудь на проводках или будет забыто включенным среди прочего хлама на столе — надо защитить от случайного касания токоведущих частей, если оно предусматривает подключение к сети. Иначе по вам может потечь абсолютно реальный электрический ток.
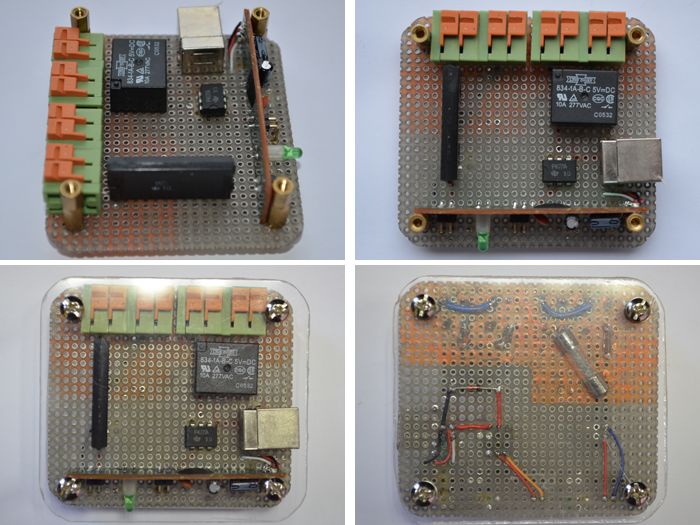
Я собрал варианты 3 и 6 на макетке, получилось так:

Несмотря на то, что это не более чем «proof of concept», мне захотелось хоть немного «навести красоту», пускай и в собственной извращенной трактовке. Такие уж нынче времена: внешний вид ценится не меньше, а порой и беспричинно больше функциональной нагрузки. Что и приводит нас к следующему этапу.

Косметика и демонстрация

От HTML — интерфейса за километр несет ботанщиной, байковыми рубашками с катышками и макаронами из стеклянной банки:

Попытаемся это хоть как-то скрасить.
  1. Так как художественные способности у меня на нуле, а вкус где то рядом с ними — идею я стырил отсюда я почерпнул вдохновение (и немного css) здесь: http://www.seanslinsky.com/demo/ios-toggle-switches/.
  2. С помощью генератора градиентов mudcu.be/bg сделал нескучные обои задник.
  3. Генератор «клевых тумблерков» proto.io/freebies/onoff/ создает кнопки, которые работают почти во всех браузерах — даже в Опере, если сделать их квадратными, и даже в IE, если он >=9.
  4. Так как на разных системах по разному работает увеличение — делаем кнопки масштаба внутри страницыdavidwalsh.name/change-text-size-onclick-with-javascript

CSS не имеет смысла приводить, потому что на 90% сгенерирован автоматически, а HTML — на 90% повтор вышеприведенного. Поэтому просто пишу как из скачать:
cd /www
mkdir luci
mv index.html luci
wget http://etherelay.googlecode.com/files/index.html
wget http://etherelay.googlecode.com/files/style.css

Вторая и третья строчка «перепрятывают» файл веб-интерфейса роутера (если он установлен) в отдельную папку, теперь он доступен по адресу _адрес_роутера_/luci. А «главной» страничкой, доступной по адресу сервера, становится наша.
Ну и, напоследок — говорят, что картинка стоит тысячи слов. В этом видео почти тысяча картинок. Надеюсь, оно хоть как-то уравновесит мою многословность.
Update: nm11 подсказал, как добавить авторизацию на веб-сервер (например, с логином wizard и паролем lumos ):
uci set uhttpd.main.config=/etc/httpd.conf
uci commit uhttpd
echo "/:wizard:lumos" > $(uci get uhttpd.main.config)
/etc/init.d/uhttpd restart